
-
Getting started with PGPigeon
What is PGP?
PGP stands for Pretty Good Privacy. At it’s core, it is an internet standard (called OpenPGP) used for data encryption and digital signatures. Software that employs this standard is available from various developers for several platforms under free and commerical licenses.
Let’s take a moment to understand some of the basics of how it works. In conventional encryption, a secret key is used to transform plaintext (the unencrypted data) into unreadable ciphertext. The same key is also used to decrypt the ciphertext and reveal the plaintext. While this process works well for encrypting data stored on your hard drive, it has its drawbacks for use in communication. For one, you need to somehow communicate the secret key to the other party. But how to do this securely? After all, the reason you are using encryption is because you don’t believe your communication channel is secure. You could meet in person and exchange the secret key offline, but that isn’t very convenient. Protocols have been developed to allow for secure exchange of keys across insecure communication channels, but they tend to work better for real-time chat than, say, sending encrypted emails.
PGP makes use of public-key encryption. One key (a public key) is used to encrypt the data and a separate key (the private key) is used to decrypt it.
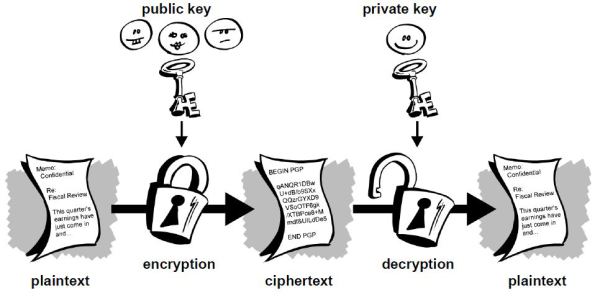
As a new user, you will generate a new public-private key pair. Just like the names suggest, you’ll share your public key with others so that they can send you encrypted messages, while keeping your private key secret so that you can decrypt the data. The process by which the key pair is generated makes it impossible (given current technology and knowledge of mathematics) for an attacker to derive your private key from the public key.
Use Cases
The most obvious use case for this type of encryption is email. Anyone who has your public key can send you encrypted emails which only you can view. Likewise, you can send encrypted emails to your contacts by first downloading their public keys. What you need to keep in mind, however, is only the body of the email will be encrypted. The subject and metadata (to, from, cc, and timestamp) will still be visible to anyone snooping on your emails.
Digital Signatures
Another feature of public-key cryptography is it allows for the creation of something called digital signatures. Much like your real life signature, a digital signature can be used to authenticate data but with the added benefit of being completely unforgeable (again given the current state of cryptography).
A digital signature is created by a mathematical algorithm which combines your private key with data you wish to “sign”. The validity of the signature can by verified by anyone simply by checking it with your public key.
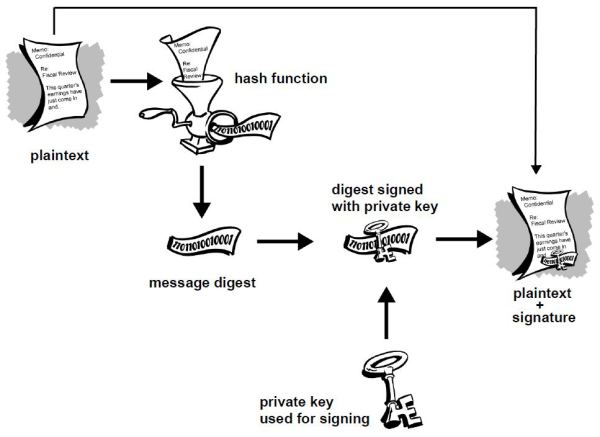
In the above diagram you see that the plaintext is run through a hash function to produce a message digest which is then signed with your private key. What this process ensures is that a signed document cannot be altered without invalidating the signature, allowing people to not only check the document’s authenticity but also the integrity of the data. Just to give an example, suppose you sign a 10,000 word document. If someone were change even a single punctuation in that document, the signature would show as invalid. To see why digital signatures are useful let’s consider a few examples:
Digital signatures are also extremely useful in verifying the integrity of software. Given the security implications, you want to be able to trust that the software you download is legitimate and wont leak information that would allow someone to steal your data. Even when downloading open source projects, unless you check and compile the source code yourself, you will most likely download a pre-compiled version that could contain malicious lines of code. Software developers will typically sign the software and provide a link to download the public key used for signing. Simply by checking the signature with his public key you can guarantee you’ve downloaded a legitimate copy.
The Toolsley File Signature Verifier allows you to do this.
Getting Started
The first thing you need to do to get started is open PGPigeon by clicking here
Generating A New Key pair
To generate a new key pair in PGPigeon you'll need to click the "Manage Keys" button on the main page and then click "Generate". You can also click the "generate your first keypair" link in the welcome message.
You'll need to enter your name, email address and a password to protect your private key.
Once the process is complete your new public/private key pair will show up in the Keys list. You can select your public key and click on “export” to send it to others, or you can copy the text of the key block and share it with people that way. A typical public key block will look like this:
    -----BEGIN PGP PUBLIC KEY BLOCK-----
    Version: OpenPGP.js / PGPigeon v1
    Comment: https://www.toolsley.com/pgpigeon.html

    xsBNBFSIOzkBB/9w9LfvTbvtUmCVRm35p8w3MB0mCbWyCnjNw6r9Iea5z4A+
    HmKEH0TXVPo+OgyvGbbggvCLGFK8oBoWza6U5US8nuZ1TPcECgMZrnRWJx0c
    uZk58sfjK4lbdW2xlBee3q9BEmagXCu82L0Cg01wWnsiXJC697ubK7+zcXhD
    jOkR50ynd9aRtjRLOFpvCr8+PLDn72HIaWzRXKidRIjYoQTu0YpXjahqbHyv
    14mvmvul//XyLRX9Mt9IOjYFAcq3ZrufR/jJ+GHdE0KfHZbBVn/kKtzF8zNJ
    VPDk+9axkB5cqDo69oslGUQXfMFV9A3VuRRXvxfwEKda0Eo5HP76oIAVABEB
    AAHNF0pvaG4gRG9lIDxqb2huQGRvZS5jb20+wsByBBABCAAmBQJUiDtDBgsJ
    CAcDAgkQn7X7LxQmIDIEFQgCCgMWAgECGwMCHgEAAHZOB/sFJNHZLkyfoyvQ
    EuWieTkYhop/IMnI4tK4/aowaRM7XZkAL7Px/67ILA4SsGNWf3N7UkTwrjkj
    1kVMS+xVLTW2ex+bF1X0ZvbmemXqF1BdL9ClPxNuBUBwT13MuCPCViNIZMm8
    epb6UBy8+Dv4wgxI53oVfjVGauHweRfibrojE6nYgc+hGmFkgg4GAAhy9yRB
    Bxowu7SjLw3pbhvrrppCpiw3XT0C7Iecb7WfbPr3GJMj37infklK8yFKyNTV
    RD5zAUlhhS+Hatb+JHK8yX8jrdBxohPn0edz4S8PBVS3suHPJ0RdYO3fHh4T
    03ni6EGZTpPZqn9ZBt2HVsfT982lzsBNBFSIOz8BB/98X5C1W9fdyvgdXnlN
    1dErSDaaGdyPcWqP1Icz5G2cQ0qXQ9J7In2wm0Pu47b0+dPbZB/kPKp+koa1
    BCkrscgML14rjVkoDtUWKKjw0/WDATPM4Qi6yogSLDiespu7TnYR05jJzjrQ
    C1QvMtqUpEKdnDP3xjadCITobixcjJcMMeprtk10WuADqjYwbnhsZKnzscfX
    T9Z8jwyGboR13VjT+vjzRxO2LaKGxMWW9KUrRJIRaf6QBv80s1qQXD0KNYRX
    5TUh8gBasezQ7QPmwtL6HXIuHz/V8j47am+A3tvHXGdYvsKmR353O/hBrhdY
    3BU9VfVtU5e0bHY4iY5pwM0bABEBAAHCwF8EGAEIABMFAlSIO0QJEJ+1+y8U
    JiAyAhsMAABYwQf+KgcroUnWptpRjQwrmkPHy/SfePcQW4ItxWVTeD9VMyWR
    M7xOnadDo43p3628pfm71gjaLKSbNs/x32+UkjGlXtoAAgi0vx6x6d4VJhkx
    tSDDkzdthClO03rR2PkCEW8cUDFtgroO71mRQge6pz2Q7CwigFqSdlOT7hIP
    p26mLQtLjWqSICypgL1XpVrgOt9FyADp/PMVSP1ay9P7Ho7sW4TLi3gG/Nys
    G/HL/6gJu4wHgkXCoMt11EKyBPe2UNY9TdVJNnzuZqYZ5UeZzZhm54MRZG25
    1cNZqiUiQopn9e+SfcdAN9guqTTxblNwopxGTaOkcvEo1KGTKIaJZI9J+A==
    =1pff
    -----END PGP PUBLIC KEY BLOCK-----
Key Servers
You might want to consider uploading your public key to key servers through the SKS OpenPGP Public Key Server Pool. Key servers are searchable directories from which other people can download your public key without first asking you for it. This functionality comes in especially handy when using email. Some email clients can be configured to search the key servers for the PGP keys of your contacts or anyone who has sent you an encrypted email and import them automatically.
Just keep in mind that once you upload a key to a server, you typically can’t remove it. It’s probably a good idea to play around with PGPigeon first, get used to it, then once you’ve created your permanent key, upload it. That way you don’t litter the key server with multiple keys bearing your name.
Importing Keys
In order to encrypt messages to send to others, you will first need to import their public key into PGPigeon. You can do this by downloading the .asc file containing their public key (either directly from others or from a key server), clicking “Import” then “Load from file” on the Manage Keys page. You also have the option to copy the public key block and import it directly by pasting it from the clipboard.
Encrypting Messages
The first thing you need to do is click “Encrypt & Sign”. This will open the editor interface. If your recipient uses PGPigeon, mailvelope or other HTML-compatible messaging solutions you can just enter and format your message. If they're using PGP from the command line or you're unsure you should click the last button on the editor's toolbar to disable HTML.
Type whatever message you want then select your recipient through the “Encrypt for” drop-down menu and click “Go”.
The resulting encrypted message will look like this:
    -----BEGIN PGP MESSAGE-----
    Version: OpenPGP.js / PGPigeon v1
    Comment: https://www.toolsley.com/pgpigeon.html

    wcBMA4FJg8rMWK8NAQf/c9gwpuDQxzIhX8F9VpYAnZNj2w2dvcapz+4IVtuI
    ccQIdAe5nPFCnG+tWO3iJ2N8T+aD9/5MuOceHSGdcP65yNZntUGH1Y5KzE2m
    CpV220JLBMUo70bKcibgI/wIkpT8uiegS7unrgI6iaZTJ3o9S+4vVM5+lspf
    NIp2FUN0lp84wUyj7pFZRWzGiMdWl7mxr87hbG5d6OOBbsTgtl9oRFsUMQSb
    yyXf170OeuQ/kapF0kN0ypvVKPryNqboMPproX1UmeI+xuY9pJ8vWHoYbS+S
    dyNYc032ICSp0w5EQomDHlo0QBsZNWQ3xgP7VVi3r3QWeE2DBrn9WCa/QZ4D
    gNJEAWPOlGjqrn3LxKI281gs/H78YpBkQtcses5Sx6ssJWOM23/fCmMEOEcl
    bpBbzF0XabEWqsTiFjhaCzp+4QEbdyndVmY=
    =Gpy0
    -----END PGP MESSAGE-----
Some things to keep in mind:
Once you encrypt something with someone else’s public key you won't be able to decrypt it. You can however encrypt a message with multiple public keys by adding multiple recipients so if you wish to be able to decrypt the messages you sent at a later date you could simply add your own public key to the list of recipients.
The side-effect of doing this is that in case your private key gets compromised all of your communication will be impacted (as opposed to "just" the incoming messages sent to you). Conversely, if you encrypt data using only your public key then only you will be able to decrypt it.
Decrypting Messages
To decrypt a message, you need to do all of the above in reverse. This time use the “Decrypt and verify” option from the menu. You will be prompted to paste your encrypted message then enter your password for your private key that you created along with your key pair. This is what prevents an attacker from stealing your private key and decrypting messages intended for you.
Keep in mind, if you are decrypting data on your normal computer, you could be running the risk that malware could copy and upload the data after you’ve decrypted it. This might be an acceptable risk for everyday communications, but if you’re dealing with extremely sensitive data you should probably transfer the encrypted data to a secure viewing station prior to decryption.
Any air gapped computer (one permanently disconnected from the internet) would work for this purpose. Or you could boot into a Linux live system (such as Tails) from a USB stick to isolate your work environment from preexisting malware.
Signing Messages
The process is just as straightforward as before except this time you will select a key to “Sign As” rather than “Encrypt for” after clicking the “Encrypt & Sign” button on the main page. Here you will again be prompted for your password. The resulting output will look like this:
    -----BEGIN PGP SIGNED MESSAGE-----
    Hash: SHA256

    Hi. This is a plaintext message.
    -----BEGIN PGP SIGNATURE-----
    Version: OpenPGP.js / PGPigeon v1
    Comment: https://www.toolsley.com/pgpigeon.html

    wsBcBAEBCAAQBQJU01vKCRCftfsvFCYgMgAAaJsH+gIhH8biTK2vlaSYOy0C
    TK3fcLDM4JDlvORzSLyonUitC4NwyePKJF6WNdcH9WN00KPxezh9creDldSa
    Up6Wptpt1HUQAgZFQBKT/M4raE6TgvX7mhPErIP3xtbZzL9TQIoVVJ93o6Vn
    jnLSYcFwXfAEECeCC2K2Ep8O5k1nqjjpqm5J1685KIgnGhiKy1Pi37kjTqY1
    n2EjlHW/GaQkl5gBXI+2gu4nxf6FBHw6zqMJsN67yGTbNGcSmBtQskY5+HHv
    88oZQvOIY5lIdK+g65hxnRwpTKefocZXW4XdKBOcy/wzWDVz31cN5w00VtNO
    rGtmEHpQebNyZKIqjAVwvnE=
    =jxS5
    -----END PGP SIGNATURE-----
Notice that the message is at the top under the header, while the signature is at the bottom.
Also keep in mind that encrypting and signing are not mutually exclusive. You can opt to both encrypt and sign your message to protect it from eavesdroppers and allow the recipient to verify the message came from you.
Note that a message that is both encrypted and signed will simply say BEGIN/END PGP MESSAGE instead of SIGNED MESSAGE and will NOT contain a separate signature block. You can think of it as the signature being hidden under the encryption.
Verifying Signatures
To verify a signature on a signed message you will obviously have to first download and import the public key of the person who signed it. PGPigeon will automatically detect and verify signatures in messages when you use the "Decrypt & Verify" option from the main page.
If you’ve done it right you will see a response that looks something like this at the top of the message viewer dialog:
Valid signature from John Doe <john@doe.com>